"Whatever we think about and thank about, we bring about." Dr John Demartini

Sunday, January 30, 2011

My Photos of 'Vrot Pampoen enne Stikkint Skoen'

This project was done about 5 years ago, thus some of the older products in the Enmarc range ;-)

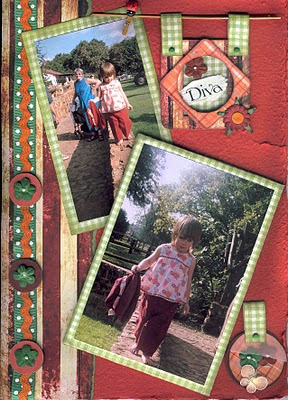
I had an idea in mind to scrap my granddaughter visiting the dairy farm, because she was 'in love' with cows at that stage. Then came the idea for the Title, because the song always reminds me of her. The idea grew bigger and bigger LOL

Firstly I decorated the wooden box, then I made her the outfit for the photoshoot. OK, then I had to buy an airplane ticket to go visit the children to do the photoshoot ;-)

I wanted to scrap mostly with ENMARC products and handmade paper which is made here locally by a lady in town. I LOVE the Enmarc White Board products, because they are so VERSATILE!!

Oh, what a bummer!!! The photos were taken long-long ago with my old camera and they are really NOT of good quality!!!! Grrrrr. ..  I will have to redo the photos :-(

These are the only 2 good photo's


No wait!! Found the scans on my PC!

Here I used a paper serviette as part of my LO

Thought the cork sayings would go well with the LO


I saw a LO in the Reflections? done by Rose Krugess and thought I will adapt it for this page. Rose is also one of my Favourites in the Scrapworld :-) Enmarc Stamps, Metallook Stickers and Transparency wording

Dress-me-up slide mount, circles, cork tags

Enmarc Stamps, Frames and wording

Moosgummi Alpha and Filmstrip, DMU squares

Serviette podged onto handmade paper. Enmarc DMU Squares.

DMU Slide Mount, squares and circles

Enmarc Stamps and Stickers

Enmarc Alpha and Moosgummi flowers

Enmarc Moosgummi Filmstrip and Lable Holder, Combo Alpha

Enmarc DMU Slide Mount, Lable Holder, 'washers' and circles, Clear Stamp, Transparency wording.

Enmarc Shape Folder stencil, Transparency wording, DMU Tag word 'Pret'

Enmarc Page Essentials, Cork Wording, Small word 'Vir Altyd'

Enmarc Page Essentials Clock, Ribbon Slides, Buttons and Clear Stamp and Alpha Stencil 'L' in laat

I quite enjoyed doing this project and like the way it came out! I hope you find some sort of inspiration here ;-)

OK, now it's time to do REAL WORK for a change! I will post some more random projects, some old ones as well as some new ones.


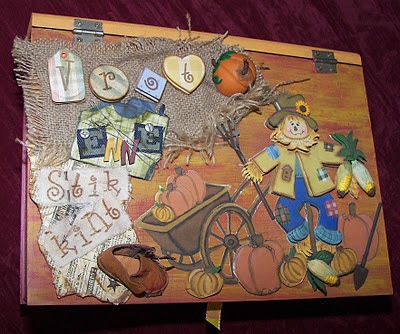
'Vrot Pampoen enne Stikkint Skoen' : Off-the-Page : Scrap Affairs #7

WOW!!! At long last my project was published! Thank you Enmarc and Scrap Affairs!!


Click on the picture to enlarge. Once it has opened in a new window, click again on the picture to enlarge it even more.

OK, that's it for tonight! It's way past my bedtime ;-) I will post more pictures on this project a.s.a.p.

Saturday, January 29, 2011

Scrap Affairs Issue #7

One of my layouts was used as part of an advertisement for Enmarc Crafts ;-)

SERVIETTE DECOUPAGE ON WOOD


REQUIREMENTS


WOODEN ARTICLE
SANDING PAPER
CRAFT PAINT
BRUSH/ES
SERVIETTE OF YOUR CHOICE
PODGE(MODGE) MEDIUM
OPTIONAL – NAPPY LINER AND SPONGE ROLLER
CLEAR VARNISH

FOR CRACK/ANTIQUE EFFECT


ANTIQUE CRACK STEP 1/ BASE COAT
ANTIQUE CRACK STEP 2 / TOP COAT
ANTIQUE COLOURING MEDIUM OR MAGIC TOUCH OR METALLIC POWDER/GOLD DUST

METHOD


  1. Prepare article: Sand wooden article till smooth, taking special care of rough edges. Sanding paper with grit between 600 and 1200 is best for wooden blanks made of supa wood.
  2.  Paint article with craft paint of your choice. Let dry between coats; sand if necessary when dry. It is better to paint 3 to 4 thin layers than 1 or 2 thick layers of paint. Any paint effects can be used like scumble glaze, cracked paint effect or dry brushing/white washing.
  3. When using a serviette, carefully cut out design whilst all 3 layers are still in place. Another method which I prefer, is to moisten the serviette around the design to be used and then carefully tear away the parts that are not wanted. Leave the serviette to dry and then remove the bottom two layers from the design. Paint some modge (podge) on the painted surface where the design must be stuck down. Place picture on article, if preferred, a nappy liner can be placed ontop of the design and a sponge roller can be used to flatten the design onto the painted surface.The serviette can also be smoothed down with a soft brush (yellow taklon) and modge (podge). Ensure that there are no air or glue (modge) bubbles underneath the serviette and take care that the edges are stuck down properly.
  4.  Wipe article with damp cloth around the design to remove excess modge (podge).
  5. Touch up the edges of the design with craft paint or paint effect to camouflage the torn edges.
  6. Seal complete surface and picture with Podge - Twice or more in opposite directions).
  7. If you want crackle effect, go to step 8.   If you don’t want crackle effect, seal the surface with Clear Varnish.
  8.  ANTIQUE CRACKLE EFFECT:  Apply a layer of Antique Crack step 1 / Base Coat. Let dry naturally. Apply a coat Antique Crack step 2.
  9. Wait untill dry (24 hours). To highlight cracks – rub metallic powder (Gold dust mixed with Turps, into cracks – wipe excess with clean cloth. (several products and ways to fill cracks available at Emsige Biene)
  10.  PLEASE!! Use only OIL BASED paint or varnish after Antique Crackle.
  11.  After any gold liners or other ink pens used for decoration – seal it with a layer of Podge to prevent ink smudge when varnished.

ENJOY YOUR PROJECT!

A little view of some other finished projects done by me
(not a good photograph L )

BOOKWORM - LOVE

This Bookworm I scrapped ages ago. It was a gift to my son and his wife for Christmas 2007.


Unfortunately there was a date setting on the camera :-(

WHERE DO I START????

*Sigh!* (Once more ;-))

So where shall I Start??

I guess. . . . . JUST START!

For now, I will post random projects as I cleared all previous posts to 'revamp' my Blog :-)

Aaaaaaah!!! At Last!

Ok, It seems to me I've got it sorted out at last! *Sigh!*

I suppose I've got to start posting now LOL

Friday, January 28, 2011

Getting there. . . .

*Pfffeewwww* Forgot all about blogging!!!, , , , but I'm getting there, slowly, but surely ;-)