"Whatever we think about and thank about, we bring about." Dr John Demartini

Tuesday, March 15, 2016

12 Tags of 2016 : January

Hello all you lovely Bloggers!

I jumped in with the February challenge of the 12 Tags of 2016, but even though I cannot participate in the January challenge anymore, I still made my tags ;-)

This year Tim Holtz decided to revisit previous years’ techniques and to combine 2 different techniques on one tag. So, for January, the Technique Remix is Chalkboard and Industrious Metal and this is what he came up with.

Don't you just love the chalkboard effect? I do! :-)

If you would like to join in on the fun, please visit Tim Holtz’s Blog -http://timholtz.com/category/12-tags-of-2016/  - for more information on this year's 12 Tags.

Products Used – TH/Ranger/Stampers Anonymous:
Stampers Anonymous – Mini Blueprints 8 CMS231
Texture Fades – Damask
Multi Medium
Distress Paint – Black Soot
Heat tool
Tonic Scissors

Here is my take on the challenge:
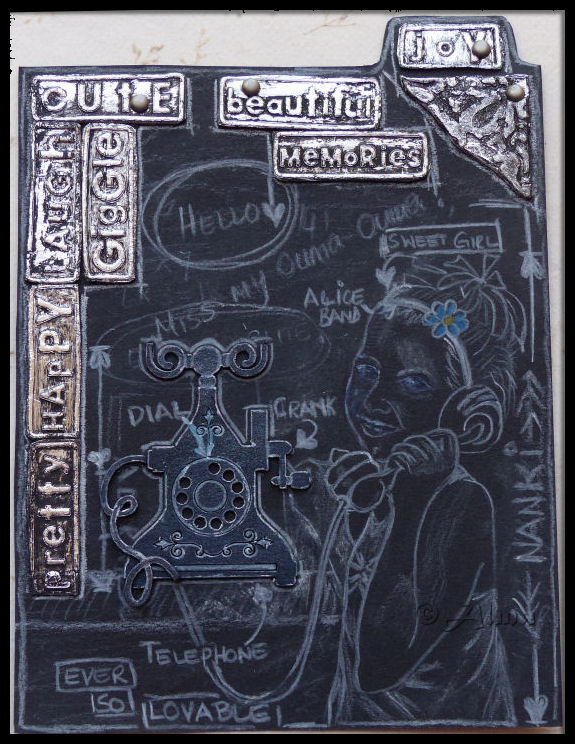
I got the sketch idea from Helen Allen and love it! :-)
  

I have yet again created 2 tags as well as a black Index Tab for my photo carousel.
I followed the recipes as much as possible, but used what I have.

A couple of close-ups :

Thank you so much for stopping by :-) Your comments are much appreciated!

Crafty Chalkboard Regards

Thursday, February 25, 2016

12 Tags of 2016 - February

So I decided to join in on the fun creating along with so many others worldwide. Tim Holtz has an endless source of creativity - how very blessed he is!!

You can follow his recipe HERE


I bought a Photo Carousel many years ago and it is still packed away in it's box!! Now, maybe it's a good idea to make use of this gadget and I will see how far I will get with this brand new plan ;-)


I started off with a manilla tag, but then added another tag as well as an index tab . . . not sure which of the 3 I might mess up along the way LOL, although I am trying my best to 'EMBRACE IMPERFECTION'!!

Here is my take on the challenge :
and the 2 tags as well:

I followed the background mono printing technique - Color Wash Butterscotch, Disstressstain Wild Honey and also Distress Ink Bundled Sage on the Index Tab.Then I did the numerals and the splatches on the index tab with stencils and texture paste. The other writing I did by putting texture paste into a bottle with a spout and then wrote onto the tags. I used copper embossing powder and then afterwards I outlined the lettering on the index tab with a gold permanent marker.

I do not have all the products Tim used, but made do with what I had available. The hearts on the background was done with a Silhouette stencil and Barn Door Distress Ink

I coloured the ladies' clothing with Distress Markers and scraped/grunged/tore/stapled the photos. Distress Markers : Stormy Sky, Peacock Feathers and Wild Honey.

The chipboard Hearts was sprayed with Dazzles - Ruby Red, the Heart Arrows and the Doodle Word with Anthracite, the flowers with Eggshell and the flowers on the last tag with Hot Tomato. I made Burlap bows to add to the flowers and to the top hearts of the index tab.

I used a fine chain to hang my Heart charms. The quotes I did on my computer and then cut it out as I do not have the word stickers used by Tim. I stamped words with Archival Ink Jet Black onto index labels and added it to the tags.

The red bows are red cotton bias binding which I squashed whilst it was wet and then left it to dry.
The tiny doilies was cut from cardstock on my silhouette and inked with Distress Ink Walnut Stain. The edges of the tags were also inked with Walnut Stain.


Thank you for stopping by and your comment is much appreciated :-)

Scrappy-Crafty Regards

Thursday, January 28, 2016

A New Life – Finnabair Inspired Mixed Media Canvas

Good day to you all Blogging Friends,

First of all I have come to realise that I am NOT a good Blogger!! Grrrr! Always something else moving up on the priority list!

I have been watching Finnabair and her Design Team's Projects for quite a while and could only sit and ’drool’ over it  . . . way too scared to try! Well, if one does not try, nothing will happen J


One day, many moons ago, I saw Finnabair’s project :
Art Recipe Wednesday: New Life of the Old Brush and it really got me inspired as I have lots of old brushes and all sorts of embellishments to get me going. Please visit Finnabair’s blog for her Art Recipe Wednesday as well as the tutorial on how to create such a canvas.

It took me another approximately 7 months to pluck up the courage to give it a try. My friend, Jacqui, and I organised a play date at the shop during her holidays. Oh what fun did we have!  We put all our ‘ingredients’ ranging from the blank canvasses and brushes to washers, paper flowers, wing nuts, buttons (like in ‘ugly’ buttons), hinges, twine, beads, nuts, bolts, chipboard embellishments, etc. out on the workspace and started off sort of slowly. We quickly got the gest of ‘How To’, but *Sigh!* the day flew by way too quickly!
Here is my Finished Canvas:
I started off by using a few Arty Stencils from Enmarc Crafts and thick gesso paste to add texture to the background and then let it dry. After all the embellishments were stuck down, I covered everything with gesso and left it to dry.

I opted for watered down acrylic paints . . . . that wasn’t so easy, because it so happened that one moment it was too pink and the next moment it was too green . . . then too pink , then too green. After a couple of these ‘trial and errors’ I was satisfied with the outcome. Next I used metallic gold acrylic paint and dry brushed all over the brush and embellishments close to it. I added Finnabair art Extra vagence Texture Paste : Clear Crackle to the handle of the brush and also a bit randomly onto some of the embellishments. Then I added Finnabair art Extra vagence Texture Paste : Gold Crackle in a blob onto the tip of the brush and added Finnabair art ingredients Glass Glitter : Gold Rush to the Gold Crackle. Then Finnabair art basics Soft Matte Gel : Transparent was added randomly with added Finnabair art ingredients Glass Glitter : Copper. Then the micro beads and seed beads were added also with the soft matte gel. I got carried away and maybe have put too many beads onto the canvas, but for now I am happy J. When everything was dry, I used a graphite pencil to accentuate and add shadows to the embellishments.

Some Close-ups of the finished project:


Finnabair Products used:

Thank you for stopping by and please leave a comment so I know you were here J

Take care and Happy Crafting!

Wednesday, December 31, 2014

Book of Days 2015 : With Effy Wild

I have really left this very late.


Launching registration for a class like this should be done months in advance. Because I've only given myself a few weeks, I'm going to need your help. In return, I will enter you in a draw for a giveaway: A free seat in ALL the sessions of Book Of Days I teach next year. I've got three of these to giveaway, so here's how to enter:
Share the permalink for this post on Facebook. Come back here and comment that you did it.
Share the permalink for this post on Twitter. Come back here and comment that you did it.
Share the permalink for this post in a blog post. Come back here and comment that you did it.
Here's the permalink. Copy, paste, share: http://wp.me/p1ZQyo-1nw
If you do all three, that's three entries in the drawing.
Woot!
Thank you so much for your help. xo
***
I will be opening Moonshine 2015 for registration next week. Watch this space or sign up for my newsletter for details.
xo
Effy